

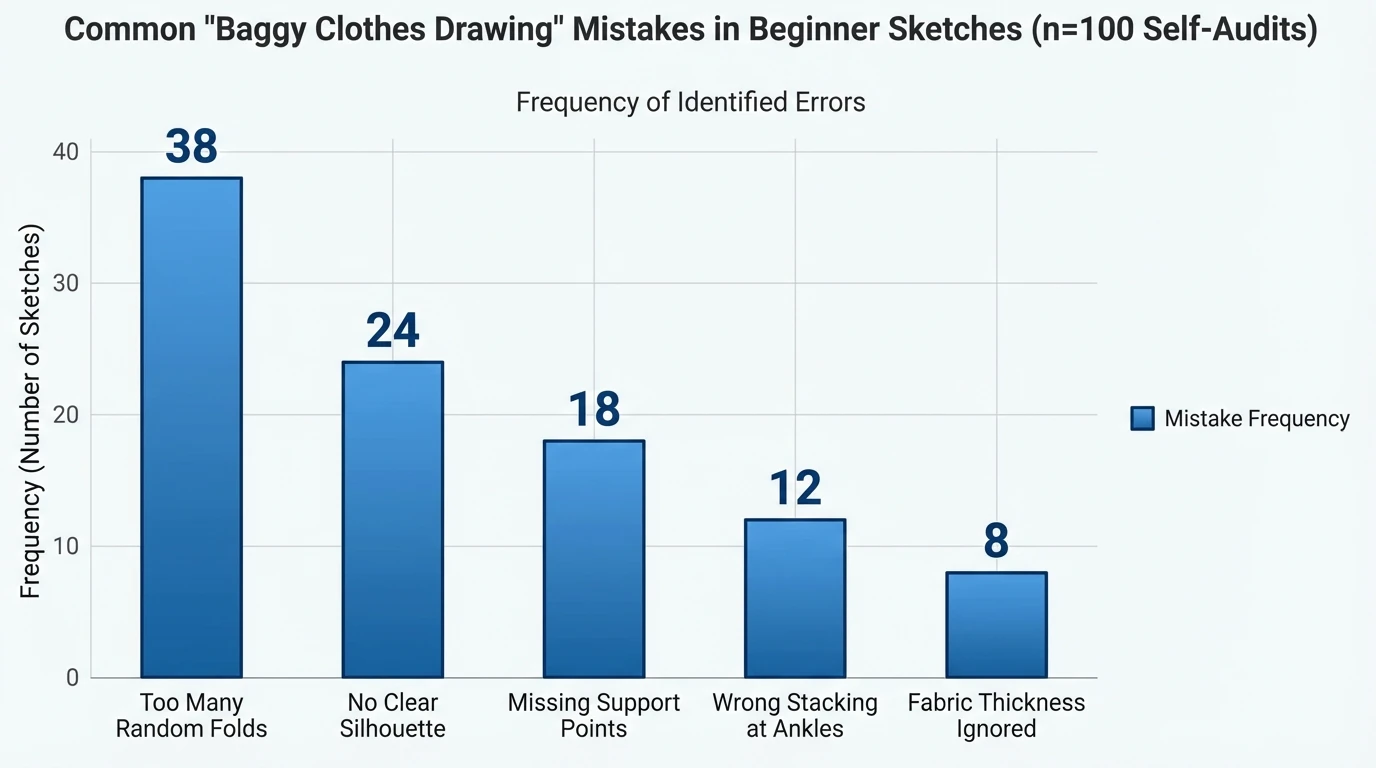
Baggy clothes have personality. They slouch, stack, sag, and swing—and if you’ve ever tried drawing baggy clothes, you know they can turn from “effortless oversized” into “inflated marshmallow” fast. I ran into this early when sketching Y2K denim silhouettes: my folds looked random, and the volume didn’t feel supported by the body underneath. The fix wasn’t more lines—it was better structure.
In this guide, you’ll learn how to draw oversized hoodies, tees, and baggy pants with believable weight, folds, and drape. You’ll also get quick checkpoints that fashion designers use so your drawings read like real garments, not costumes.
Why drawing baggy clothes is tricky (and how to think like fabric)
When you’re drawing baggy clothes, you’re not drawing “big body parts.” You’re drawing fabric reacting to gravity, motion, and where the garment is supported (shoulders, waistband, cuffs). Oversized garments have more slack, which means folds are larger and more directional—but they still follow logic. If the fold pattern doesn’t point back to a support point, it will look noisy.
A simple mental model that works for beginners:
- Support points: where fabric “hangs from” (shoulder seam, waistband, belt, wrist cuff).
- Tension points: where fabric is pulled tight (elbows, knees, hips in motion).
- Compression zones: where fabric stacks up (ankles, wrists, behind knees).
For fold fundamentals, I like cross-checking clothing reference boards (great for silhouette variety) on Pinterest and then validating the fold logic with structured tutorials like Proko’s figure drawing resources (excellent for understanding the body underneath).
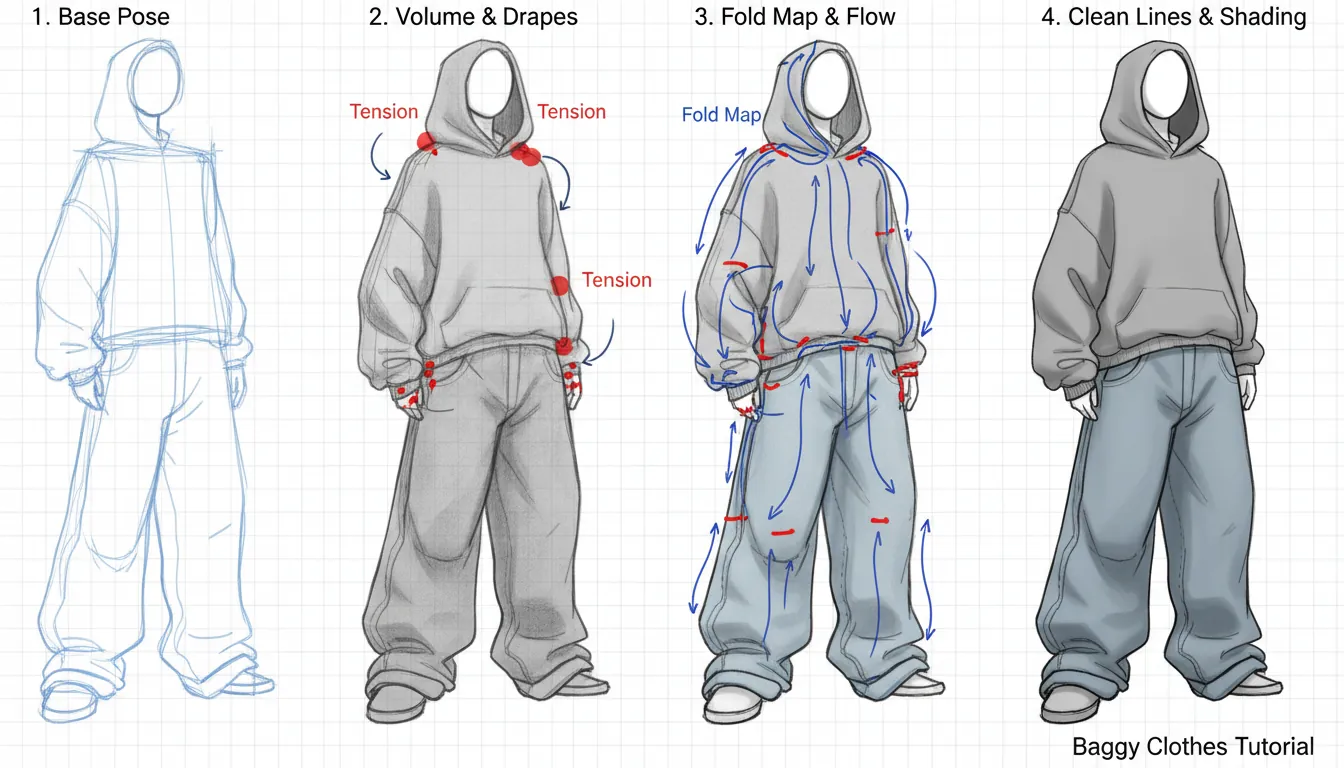
The core rule: silhouette first, folds second
Most “baggy” errors happen because folds are added before the silhouette is clear. In drawing baggy clothes, the silhouette is 70% of the look—especially for streetwear, Y2K, and gender-fluid styling. Start by drawing the body lightly, then design the garment shape around it.
Use this sequence:
- Gesture + body block-in (simple mannequin).
- Garment envelope (the outer shape of the hoodie/pants).
- Landmarks (neck opening, shoulder line, waist, crotch, knees, cuffs).
- Major folds only (big readable folds).
- Secondary wrinkles (small accents, only where needed).
A good self-check: If you erase all fold lines, does the outfit still read as oversized? If not, the silhouette needs work.
Step-by-step: drawing baggy tops (hoodies, tees, jackets)
Baggy tops are about hang and drop. The shoulder seam often sits lower than the shoulder, sleeves balloon, and the torso fabric drapes from the chest/upper back rather than clinging to the waist.
1) Place the “drop shoulder” correctly
In oversized hoodies and tees, the shoulder seam often falls halfway down the upper arm. When drawing baggy clothes, this small shift instantly signals “oversized.”
Key cues:
- Neck opening stays near the body.
- Shoulder seam moves outward and down.
- Sleeve cylinder starts lower, so the sleeve looks heavier.
2) Map folds to tension + gravity
Use fewer, clearer folds:
- At the armpit, folds radiate outward (fabric pivots around the arm).
- At the elbow, folds compress on the inside bend and stretch on the outside.
- At the hem, fabric either hangs straight (heavy) or kicks outward (motion/wind).
3) Add thickness where it matters
Hoodies and jackets have thickness:
- Show a double edge at cuffs and hem (ribbing).
- Give the hood a layered rim and a shadow under it.
- Make the fabric look heavier by smoothing some areas instead of filling everything with wrinkles.
For a clear oversized clothing demo, see an oversized clothing tutorial like HOW TO DRAW OVERSIZED CLOTHING & PRINTS and focus on how the artist simplifies folds.
Start Drawing CLOTHING FOLDS Like This!
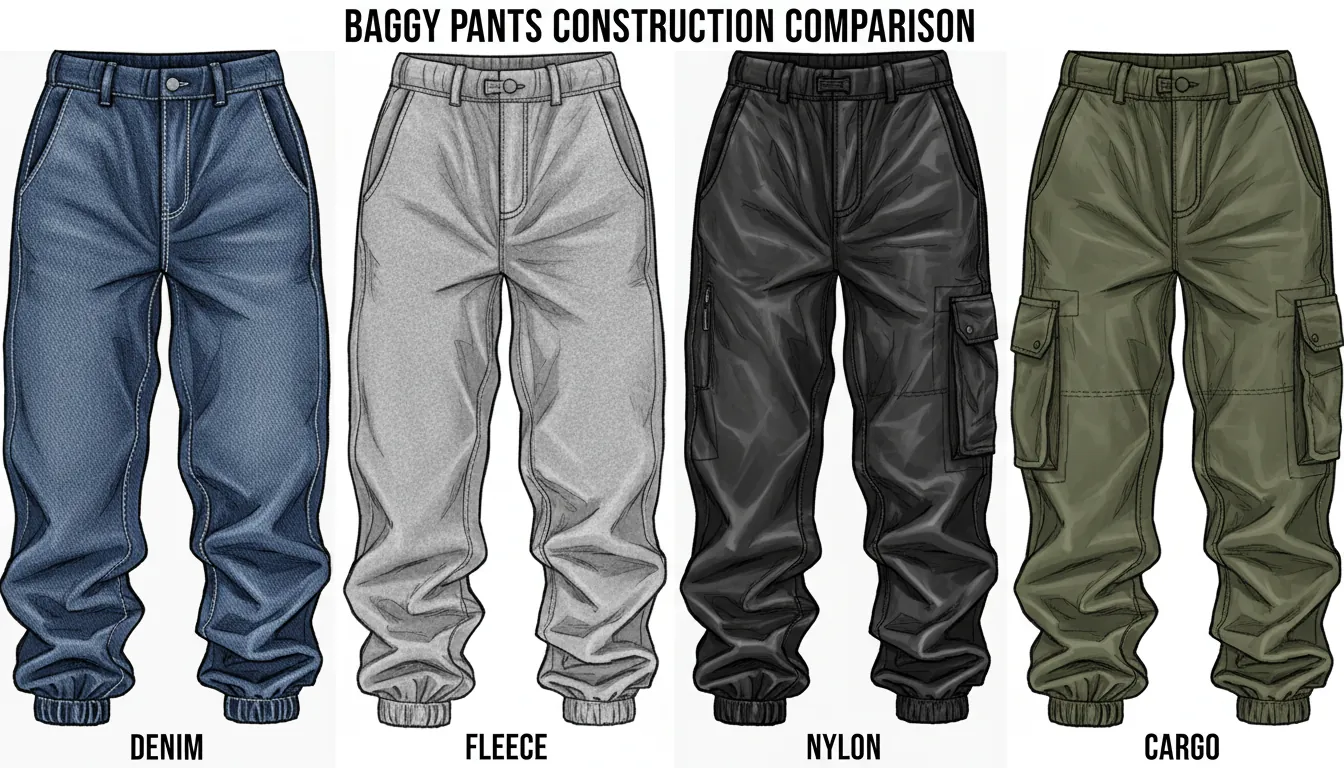
Step-by-step: drawing baggy pants (jeans, cargos, sweatpants)
Baggy pants look right when they show structure at the top and stacking at the bottom. Most silhouettes widen from hip to thigh, then either stay wide or taper slightly, and finally compress into stacks above the shoe.
1) Anchor the waistband and crotch
If the waist and crotch placement is vague, the pants will look like a floating tube. In drawing baggy clothes, the top fit determines the rest:
- Mark waistband height and belt loops (even lightly).
- Indicate the fly area as a simple shape.
- Place pockets to show construction.
2) Build the leg as a soft tube with a seam path
Add a side seam line (subtle) to show the pants wrap around the leg. Then decide:
- Wide-leg: straight down, minimal taper.
- Tapered baggy: wide thigh, narrower cuff.
- Cargos: wide leg with pocket mass on the side.
3) Draw “stacks” at the ankle (the baggy pants signature)
Stacking folds are compressed, horizontal-ish folds that pile above the shoe. Keep them readable:
- Use 4–8 main stack folds per leg (not 30 tiny ones).
- Make stacks tighter near the cuff and looser above.
- Add a couple of diagonal folds pointing up toward the knee for flow.
For a beginner-friendly breakdown of billowy pants folds, a tutorial like Easy Figure Drawing: How to Draw Baggy Pants is useful—especially for understanding where to simplify.
Fold types that make oversized outfits look believable
When you’re drawing baggy clothes, you’ll see the same fold families repeated. Learn these and you can “design” wrinkles instead of guessing.
- Pipe folds: long tube-like folds (common in sleeves and wide pant legs).
- Zig-zag folds: sharp angular folds from bending joints (elbows, knees).
- Spiral folds: twisting motion (turning torso, rotating forearm).
- Half-lock folds: fabric caught and folding back on itself (near cuffs/waistband).
- Stacking folds: compressed piles (ankles, wrists).
Practical tip I use: pick one dominant fold type per area. For example, pipe folds down the thigh + stacking folds at the ankle. Mixing everything everywhere kills clarity.
Baggy clothes style notes: Y2K, gender-fluid, cyberpunk silhouettes
Oversized fashion isn’t one look—it’s a silhouette language. If you’re doing drawing baggy clothes for character design, decide the “era logic” first.
Y2K / nostalgia baggy
- Low-rise or mid-rise denim, wider leg opening
- Cropped baby tees + oversized pants contrast
- Visible stitching, heavy pocket details
Gender-fluid oversized
- Boxy shoulders, relaxed waist shaping
- Neutral drape: fewer “hourglass” cues, more straight lines
- Layering: oversized shirt over tee, wide trousers
Cyberpunk oversized
- Exaggerated proportions + tech details
- Straps, segmented panels, cargo pockets
- Higher contrast lighting and sharper shadow shapes
If you’re sketching these with production in mind (not just art), construction details matter: seam placement, pocket bags, and fabric weight should match the vibe.
“Looks cool” vs “could be manufactured”: a quick reality check (designer lens)
I’ve worked with teams where an illustration looked amazing, but it couldn’t be sampled cleanly because the design didn’t resolve key construction points. Even if your goal is art, borrowing a manufacturer mindset makes your drawing baggy clothes feel more authentic.
Check these three items:
- Where does the garment close? (zipper, buttons, elastic, drawcord)
- What holds the volume? (pleats, gathers, darts, elasticated hem)
- What fabric is implied? (denim stacks differently than fleece)
SkyKingdom Group (as an OEM/ODM partner for trend-driven denim and woven apparel) emphasizes speed-to-sample and scalable production. That matters because oversized silhouettes often rely on pattern decisions—rise height, thigh width, knee shape, hem opening—that can be dialed up or down quickly during sampling.
| Problem | Why it happens | Quick fix | Pro detail to add |
|---|---|---|---|
| Pants look like balloons | Even width throughout; no anchor points at waist/knee/ankle; folds placed randomly | Taper toward joints and cuffs; show a beltline/waistband; add pinch points at knees and ankles | Indicate tension lines from waistband, fly, and pockets; add a few long gravity folds from seat to knee |
| Hoodie looks stiff | Hem and sleeves drawn as rigid tubes; no fabric weight; folds ignore shoulder/arm structure | Break silhouette with sag at chest/hem; add folds at armpits and elbows; soften edges | Add layered thickness at cuffs/hem and hood seam; show slight bunching where fabric compresses under straps or arms |
| Stacks look messy | Too many short wrinkles; inconsistent fold rhythm; stacks not aligned to the leg’s flow | Use fewer, larger folds; keep stacks clustered near the cuff; follow the leg’s curve | Add compression “rings” with alternating light/shadow bands; vary fold depth (one or two deep folds, the rest subtle) |
| Outfit hides the pose | Silhouette too boxy; no indications of torso tilt or limb direction; folds don’t describe form | Re-establish gesture first; show limb angles through fold direction; carve negative space around elbows/knees | Add “structure hints” (ribcage/hips) via fold arcs; use tension folds to point to joints and weight-bearing leg |
| Fabric reads wrong (denim vs fleece) | Same fold type and edge treatment for all materials; incorrect thickness and drape | Match fold shape: denim = sharper, fewer; fleece = softer, rounder, more volume | Add material cues: denim stitching, crisp hem, pocket corners; fleece knit texture, puffier seams, softer specular highlights |
Tools and references that speed up learning
Your progress in drawing baggy clothes is mostly about reps with good reference—not talent. Mix quick studies with a few longer drawings where you refine edges and shadows.
Recommended practice stack:
- 2-minute gesture + silhouette (focus on outer shape only)
- 10-minute construction (support points + major folds)
- 30-minute render (material texture + thickness + shadows)
Reference sources I actually use:
- Streetwear lookbooks and candid outfit photos (real gravity, real stacking)
- Pose packs with hoodies and wide pants on Pinterest
- Anatomy refreshers from Line of Action (timed figure sessions help you keep the body readable under baggy fits)
Mini practice drills (do these for 7 days)
These drills are designed so you can feel improvement fast while drawing baggy clothes.
- Drop-shoulder drill: draw 20 torsos with shoulder seams placed progressively lower.
- Stacking drill: draw 30 ankles with 4–8 stack folds each; vary shoe height.
- Fabric weight drill: redraw the same pants as denim, fleece, and nylon by changing fold softness and edge sharpness.
- Motion drill: draw baggy pants in a walk cycle pose—watch how folds shift to the forward leg.
If you only do one: do stacking. It’s the fastest way to make baggy pants read as “street.”
Conclusion: Make baggy look effortless by making it structural
Baggy outfits aren’t random wrinkles—they’re fabric decisions that hang from real support points. Once you treat silhouette as the main event and folds as a supporting cast, drawing baggy clothes becomes predictable and fun. I still do quick “silhouette-only” passes before adding any fold lines, and it saves me every time—especially on oversized hoodies and stacked denim.
If you’re designing oversized denim or woven silhouettes for a DTC drop, SkyKingdom Group’s fast sampling (7 days) and low MOQs can help turn a sketch into a wearable prototype with manufacturing-grade QC. Share your biggest struggle (hoodies, pants stacking, or folds) in the comments, and pass this guide to a friend who keeps drawing “puffy” oversized fits.
FAQ: Drawing Baggy Clothes
1) How do I draw baggy clothes without making them look fat?
Keep the body lightly indicated underneath, design a clear outer silhouette, and place folds only where fabric is supported or compressed (waistband, cuffs, elbows, knees).
2) What are the easiest baggy clothes to draw for beginners?
Oversized hoodies and sweatpants are easiest because the fabric is thicker and folds are softer, so small perspective errors are less obvious.
3) How do I draw baggy jeans stacking at the ankle?
Use 4–8 main horizontal-ish folds that compress toward the cuff, then add 1–2 diagonal folds pointing back toward the knee to show flow.
4) How do I show fabric weight in baggy clothes drawings?
Denim has sharper edges and more structured folds; fleece has rounder folds; nylon has crisp highlights and fewer deep wrinkles.
5) Where should I put the shoulder seam on an oversized hoodie?
Lower than the natural shoulder—often mid-upper arm—so the sleeve starts lower and the torso looks boxier.
6) How do I draw oversized clothes that still show the pose?
Prioritize gesture and limb angles first, then keep large quiet areas in the garment so the pose reads through the silhouette and shadow shapes.
7) What references are best for drawing baggy outfits?
Candid street photos and lookbooks for real drape, plus timed figure practice for anatomy. Pinterest boards can help with silhouette ideas, but validate folds using real-photo reference.