
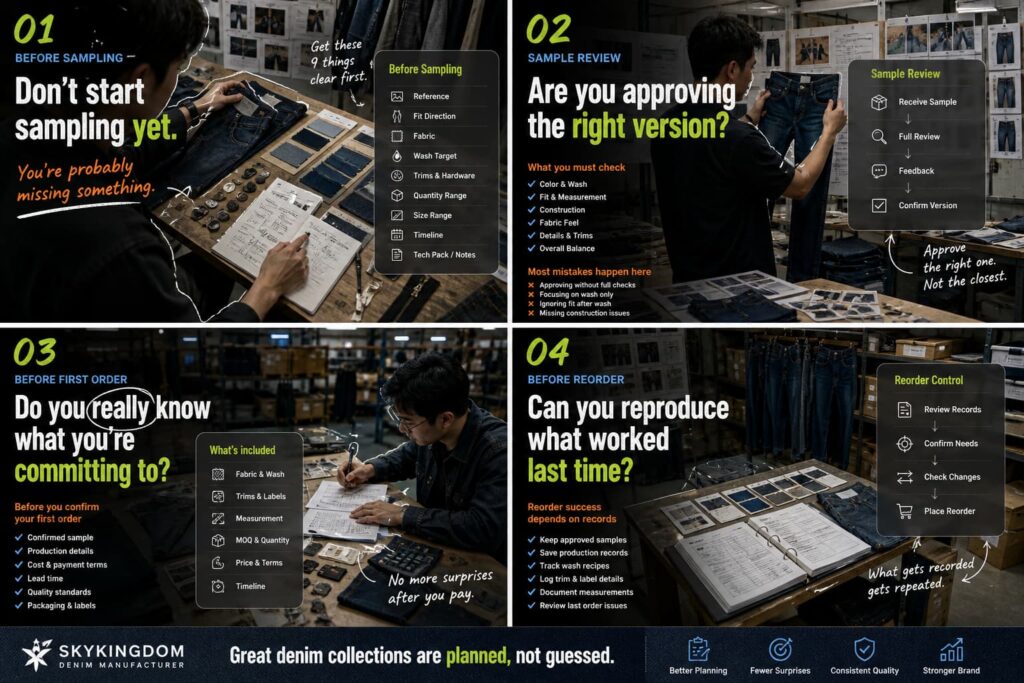
1. Reference Image or Sketch
A reference image is not a mood board. It is a single, specific garment photo — or a hand-drawn sketch — that shows the silhouette, proportions, and key construction details you want to achieve. Front view and back view are the minimum. If you have a physical garment you want to replicate or modify, photograph it flat-laid with a ruler for scale.
What works: A photo of an existing pair of jeans with notes like “widen thigh by 1 inch, change to button fly, keep this back pocket shape.”
What does not work: A Pinterest board with 40 images in different styles, captioned “something like this vibe.”
The more specific the reference, the fewer sample rounds you will need. If you are working from a reference garment rather than a tech pack, send front, back, side, inside waistband, pocket detail, and any hardware close-ups.
2. Target Fit Direction
Fit direction means the intended relationship between the garment and the body. This is not the same as choosing a size — it is about deciding the overall shape before any measurements are graded.
Key decisions you need to make before sampling begins:
- Rise height: low, mid, or high
- Leg shape: skinny, straight, tapered, wide-leg, barrel, bootcut, flare
- Thigh room: fitted, standard, relaxed
- Waistband type: classic, contoured, elastic, drawstring, extended tab
- Intended wear position: sitting at natural waist, below navel, or at hip
If you have an existing garment that fits the way you want, send it as a physical counter sample. A counter sample communicates fit direction faster than any written description. If you cannot send a physical sample, provide flat measurements of the reference garment — waist, front rise, back rise, thigh, knee, leg opening, and inseam — measured according to a consistent method (typically laid flat, not worn).
Fit is the single most cited reason consumers return denim online. Research from Alvanon indicates that 42% of consumers rank fit as their primary concern when purchasing jeans, and 85% report higher brand loyalty when fit is consistent. Getting the fit block right at the sampling stage prevents compounding measurement drift across sizes during bulk grading. For a deeper look at how sample-to-bulk consistency is controlled, see Sample-to-Bulk Consistency.
3. Fabric Direction
Denim is not one fabric — it is a category with hundreds of variations. Before sampling, you need to specify or narrow down at least these variables:
- Weight: typically measured in ounces per square yard. Lightweight (under 9 oz) for shirts and summer styles; midweight (9–12 oz) for most jeans; heavyweight (12 oz and above) for workwear and structured pieces.
- Stretch content: rigid (100% cotton, no stretch), comfort stretch (1–2% elastane), power stretch (3–5% elastane), or super stretch (above 5%). The stretch percentage directly affects how the garment recovers after wear, how measurements shift after washing, and how the wash effects develop — rigid denim takes fading and whisker patterns differently than stretch blends.
- Weave: right-hand twill (most common, produces a classic diagonal), left-hand twill (softer hand feel, used by some heritage brands), or broken twill (reduces leg twist).
- Color / base: raw indigo, sulfur black, overdyed, ecru, colored warp/weft combinations.
If you are unsure which fabric to use, providing a reference garment or a photo with notes like “similar weight and stretch to [specific product name]” gives the development team a starting point for recommending appropriate options. For an overview of fabric types and capabilities, see Washes, Fabrics & Trims. Fabric is typically confirmed before sampling begins — if fabric needs to be sourced or developed from scratch, this adds lead time before the 7-day sample window starts.
4. Wash Target
Wash is what makes two pairs of jeans cut from the same fabric look and feel completely different. Before sampling, you need to communicate your wash target clearly enough that a wash technician can interpret it without guessing.
Effective ways to communicate wash:
- Physical wash sample: the most reliable method. Send or photograph a garment with the exact wash tone, fading, and hand feel you want.
- Detailed photo with annotations: mark where you want whiskers, where you want fading, how light or dark the overall tone should be. Include close-ups of the thigh, knee, and hem area.
- Wash name or technique direction: for example, “medium stone wash with light enzyme, no bleach, soft hand feel” or “raw rinse, minimal fading, stiff hand.”
What makes wash tricky is that results are affected by the specific fabric, the specific chemical lot, water temperature, machine load size, and processing time. A wash that looks right on a 10 oz rigid twill will look different on a 12 oz stretch fabric even with the same recipe. This is why wash recipes are documented at the sample stage — so that when bulk production starts, the wash facility has a locked reference to reproduce.
If you skip the wash target or describe it vaguely (“just make it look vintage”), expect at least one extra sample round dedicated solely to wash correction. For a detailed wash approval framework, see the companion guide: Denim Wash Review Checklist Before Production.
5. Trim and Hardware Selections
Trims include everything on the garment that is not fabric: buttons, rivets, zippers, labels, hang tags, back patches, pocket flashers, thread color, and bartack details.
Before sampling, confirm at least:
- Main button: shank or tack, metal or coated, branded or unbranded, diameter
- Rivets: exposed or covered, metal finish (antique brass, nickel, gunmetal, matte black)
- Zipper: YKK or alternative, metal or nylon, specific color
- Thread: contrast stitch or tone-on-tone, thread weight
- Labels: main label (woven or printed, content, placement), care label (fiber content, wash instructions, country of origin), size label, hang tag
- Back patch: leather, jacron, woven, printed, embossed, or none
If you have not finalized your brand identity or label artwork, communicate this early. Generic placeholder trims can be used for fit samples, but final trims must be confirmed before the production sample (also called the pre-production sample or PP sample). Trim minimums also have their own MOQs — custom-engraved buttons or branded rivets often require minimum orders of 500–1,000 pieces, which affects your cost structure even on a low-MOQ production run.
6. Quantity Range
You are not placing a production order at the sampling stage, but your intended quantity range affects how sampling is approached. A brand planning 200 pieces per style will be working with different fabric and trim options than a brand planning 3,000 pieces per style.
Why quantity matters before sampling:
- Fabric availability: some fabrics are only stocked in bulk rolls. If your order is small, you may need to choose from in-stock options rather than custom-developed fabric.
- Trim MOQs: custom hardware has minimum order quantities. If your total order cannot meet those minimums, you may need to use stock trims.
- Wash setup: certain wash techniques (like laser finishing or specialized enzyme treatments) have setup costs that only make economic sense above a certain volume.
- Cost projection: your per-unit cost will vary significantly between 200 and 2,000 pieces. Knowing the range early helps the development team recommend the right material and construction approach for your budget.
Be honest about your expected volume. Overstating it leads to samples built with materials or processes that will not be available at your actual order size. For more detail on how low-MOQ conditions affect production planning, see Low MOQ Denim Production: What to Confirm First.
7. Size Range
Before sampling, decide which sizes you plan to produce and which size you want the sample made in.
Standard practice is to sample in one base size — typically the median of your range (for example, size 30 or 32 in menswear, size 27 or 28 in womenswear). The remaining sizes are graded mathematically from that base size using your approved grade rule.
Information to provide:
- Size range: e.g., 26–34 or XS–XL
- Sample size: which single size you want for the first sample
- Grade rule: if you have one. If you do not, a standard denim grade rule can be applied, but confirm this with your development partner before production — grading assumptions affect how the fit translates across the full size run
If you are offering an inclusive or extended size range, flag this early. Extended sizing often requires adjusting the pattern proportionally rather than simply scaling up, especially in rise, thigh circumference, and waistband curve. This is a development decision, not just a grading decision.
8. Target Timeline
Sampling does not begin the moment you send an email. It begins when all of the above items are confirmed, and fabric and trims are either in stock or sourced.
A realistic timeline for a first development sample — with fabric and trims already confirmed — is approximately 7 days from the point all inputs are locked. If fabric needs to be sourced, or if you are still deciding between multiple wash directions, add that lead time on top.
Common timeline mistakes:
- Assuming “7 days” starts from the first inquiry, not from confirmed inputs
- Not accounting for shipping time from the sample facility to your location
- Requesting multiple colorways or washes on the same timeline as a single sample
- Changing the fit direction or fabric after sampling has started, which resets the clock
Build your product calendar backward from your launch date, and include time for at least two sample rounds — one development sample and one pre-production sample. Brands that plan for only one round often find themselves either rushing approval or launching with unresolved fit or wash issues. For a step-by-step view of how the full process unfolds, see How It Works.
9. Tech Pack — or Organized Development Notes
A complete tech pack is ideal but not always required to begin. What is required is organized information. If you do not have a tech pack, you can start with:
- A clear reference image (see item 1)
- Flat measurements of a reference garment
- Fabric and wash direction
- Trim notes (even if preliminary)
- Size and quantity range
What cannot be skipped regardless of format:
- Measurements for the sample size
- Fabric direction (weight, stretch, color)
- Wash direction (at minimum a photo or physical sample)
If you have a tech pack, send the latest version and flag which sections are final versus which are still being decided. A half-finished tech pack presented as final creates more confusion than organized notes presented honestly as “in progress.” For a deeper discussion of when a tech pack is necessary versus when references are enough, see the companion guide: Do You Need a Tech Pack to Start Denim Sampling?
The Cost of Being Unprepared
Every item you leave undefined at the start of sampling will surface as a question, a delay, or an unwanted surprise later. In denim specifically, the interaction between fabric, wash, and fit means that changing one variable often forces recalibration of the others. Changing fabric weight after a wash sample has been approved means the wash needs to be re-developed. Changing the rise after fit has been approved means the pattern needs re-drafting and the sample needs re-cutting.
The most efficient path through sampling is not the fastest path — it is the most prepared one.
Where to Start
SkyKingdom works with growth-stage brands — from first-collection startups to scaling DTC labels — that need denim development support from sampling through to bulk production and reorders. If you are organizing your sampling inputs and want to discuss your project, start a conversation here.